How to Install Jenkins on Debian 10 or Raspberry Pi OS
Jenkins is an open-source project that gives developers a powerful GUI to automate daily DevOps tasks with a push of a button or webhooks.

Updated:
June 5, 2022 - Debian 11 Installation warning
April 5, 2023 - Repository Signing Key Update on 2.387.2
Why Use Jenkins CI/CD?
I have been building Docker for a while and I found myself doing repetitive tasks on the CLI such as from pulling from GitHub, changing Dockerfiles and Docker build and more! I came across Jenkins that lets you continuously integrate and continuously deliver or CI/CD.
Project Overview
This project enables you to install Jenkins on Debian or Raspberry Pi operating systems.
Overview of the installation steps:
- System Update
- Java Installation
- Jenkins Pre-Installation
- Jenkins Installation
- Post Installation
1. System Update
Before installing make sure your system is up to date.
sudo apt update
sudo apt upgrade
2. Java Installation
You will need to explicitly install a Java runtime environment, because Oracle's Java RPMs are incorrect and fail to register as providing a java dependency. Thus, adding an explicit dependency requirement on Java would force installation of the OpenJDK JVM.
Available Compatible Java
- 2.164 (2019-02) and newer: Java 8 or Java 11
- 2.54(2017-04) and newer: Java 8
- 1.612 (2015-05) and newer: Java 7
OpenJDK Library
Search for the library that is best for your stack.
sudo apt search openjdk
Install Java
For this project, we will install the latest Java 11.
sudo apt install openjdk-11-jre
Java Installation Status
Check java installation version to make sure it is up and running.
java --version
Results should show:
openjdk 11.0.9 2020-10-20
OpenJDK Runtime Environment (build 11.0.9+11-post-Debian-1deb10u1)
OpenJDK 64-Bit Server VM (build 11.0.9+11-post-Debian-1deb10u1, mixed mode)
3. Jenkins Pre-Installation
This part makes sure you have source list so Jenkins can properly grab updates on your device.
Get Source List Package Key from GitHub
Get package key for Debian package repository of Jenkins to automate installation and upgrade.
The Jenkins project produces two release lines: Stable (LTS) and regular (Weekly). Depending on your organization's needs, one may be preferred over the other. See the links below for more information and recommendations about the release lines.
Install WGET
Install wget prior to proceeding to pre-installation.
sudo apt-get install wget
Check package to verify it has been successfully installed.
wget --version
Stable (LTS) - Recommended
Long-Term Support (LTS) release baselines are chosen every 12 weeks from the stream of regular releases. Recommended for conservative users, it’s preferable to stick to a release line which changes less often and only receives important bug and security related fixes.
wget -q -O - https://pkg.jenkins.io/debian-stable/jenkins.io.key | sudo apt-key add
Regular releases (Weekly) - Optional
This release line delivers bug fixes and new features rapidly to users and plugin developers who need them. Recommended for releases with all features, improvements, security, and bug fixes integrated since the last release.
wget -q -O - https://pkg.jenkins.io/debian/jenkins.io.key | sudo apt-key addDebian 11 Installation Warning
If you get the warning installation when you are installing on Debian 11, install curl and use the install curl installation method.
"Warning: apt-key is deprecated. Manage keyring files in trusted.gpg.d instead (see apt-key(8))."
Install Curl
Install and Use Curl on Debian 11 Bullseye Linux (lincuna.com)
Jenkins Curl Install
Before version 2.387.2
curl -fsSL https://pkg.jenkins.io/debian-stable/jenkins.io.key | sudo tee \
    /usr/share/keyrings/jenkins-keyring.asc > /dev/null
After version 2.387.2
curl -fsSL https://pkg.jenkins.io/debian/jenkins.io-2023.key | sudo tee \
  /usr/share/keyrings/jenkins-keyring.asc > /dev/null
Add to Source List
By adding this source list, you are able to get updates install packages from Jenkins.
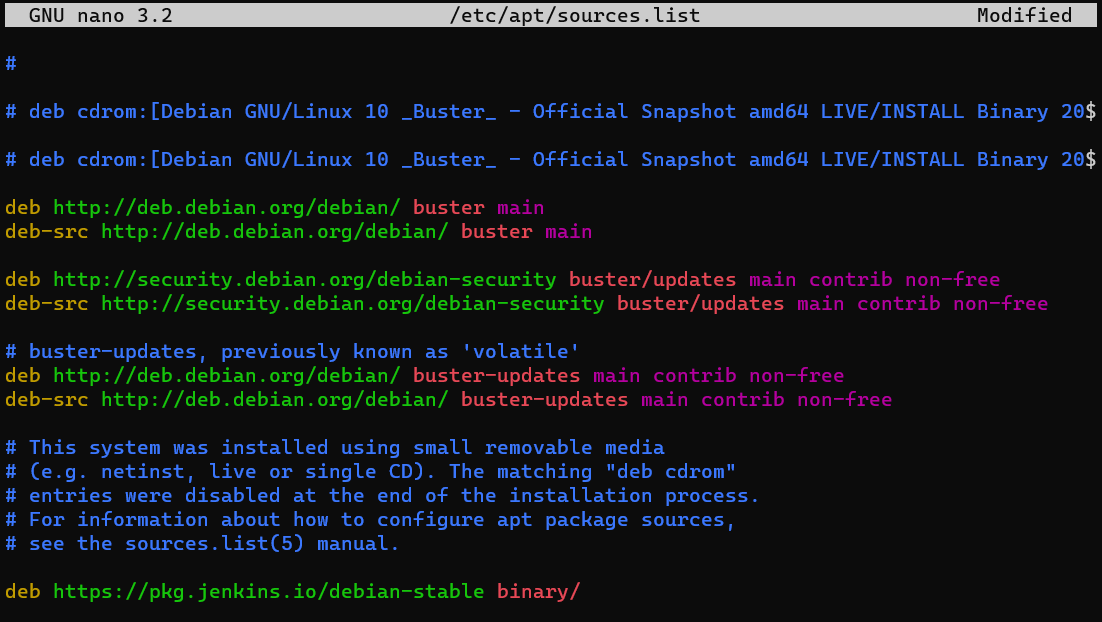
sudo nano /etc/apt/sources.list
Copy and Paste
Add to the following list. See Image.
deb https://pkg.jenkins.io/debian-stable binary/
4. Jenkins Installation
Once you have Java and pre-installation, you are finally ready to install Jenkins in your system.
sudo apt update
sudo apt install jenkins
After installation is completed go to designated IP on your web browser.
localhost:8080
If localhost:8080 doesn't work, use your system IP address, such as 192.168.1.2:8080. If you don't know your device IP address use the command below:
hostname -I
Once you are able to load Jenkins on your web browser it will prompt for an initialAdminPassword. To find out, type secret password on your CLI. Once you are able to pass initialAdminPassword, you are ready to install additional plug-ins and create your admin credentials.
sudo cat /var/lib/jenkins/secrets/initialAdminPassword
5. Post Installation
Errors
If you come across user connection errors while using with Docker, add docker as a user. Not having docker as a user may cause connection errors with docker on builds.
sudo usermod -aG docker jenkins
sudo systemctl restart docker
If you come across folder setting errors, make sure folder ownership is to jenkins:jenkins. Not having jenkins as user permission may cause build errors.
sudo chown -R jenkins:jenkins /var/lib/jenkins
GitHub or Repository Pulls
To properly pull your repository, install git in your system or if you are having problems connecting with your git repositories.
sudo apt install git
Jenkins Commands for Systemctl
Commands to help you navigate Jenkins without using GUI using CLI.
sudo systemctl status jenkins
sudo systemctl restart jenkins
sudo systemctl start jenkins
sudo systemctl stop jenkins
sudo systemctl enable jenkins
sudo systemctl disable jenkins
Uninstall
sudo apt-get remove --purge jenkins